Security Logs provide information about user activity on your instance. View the log Status, Date of the logged event, Username of the user that triggered the logged event, and Event Description.
Select View Logs at the top of the Security page to access your Security Logs.

Overview
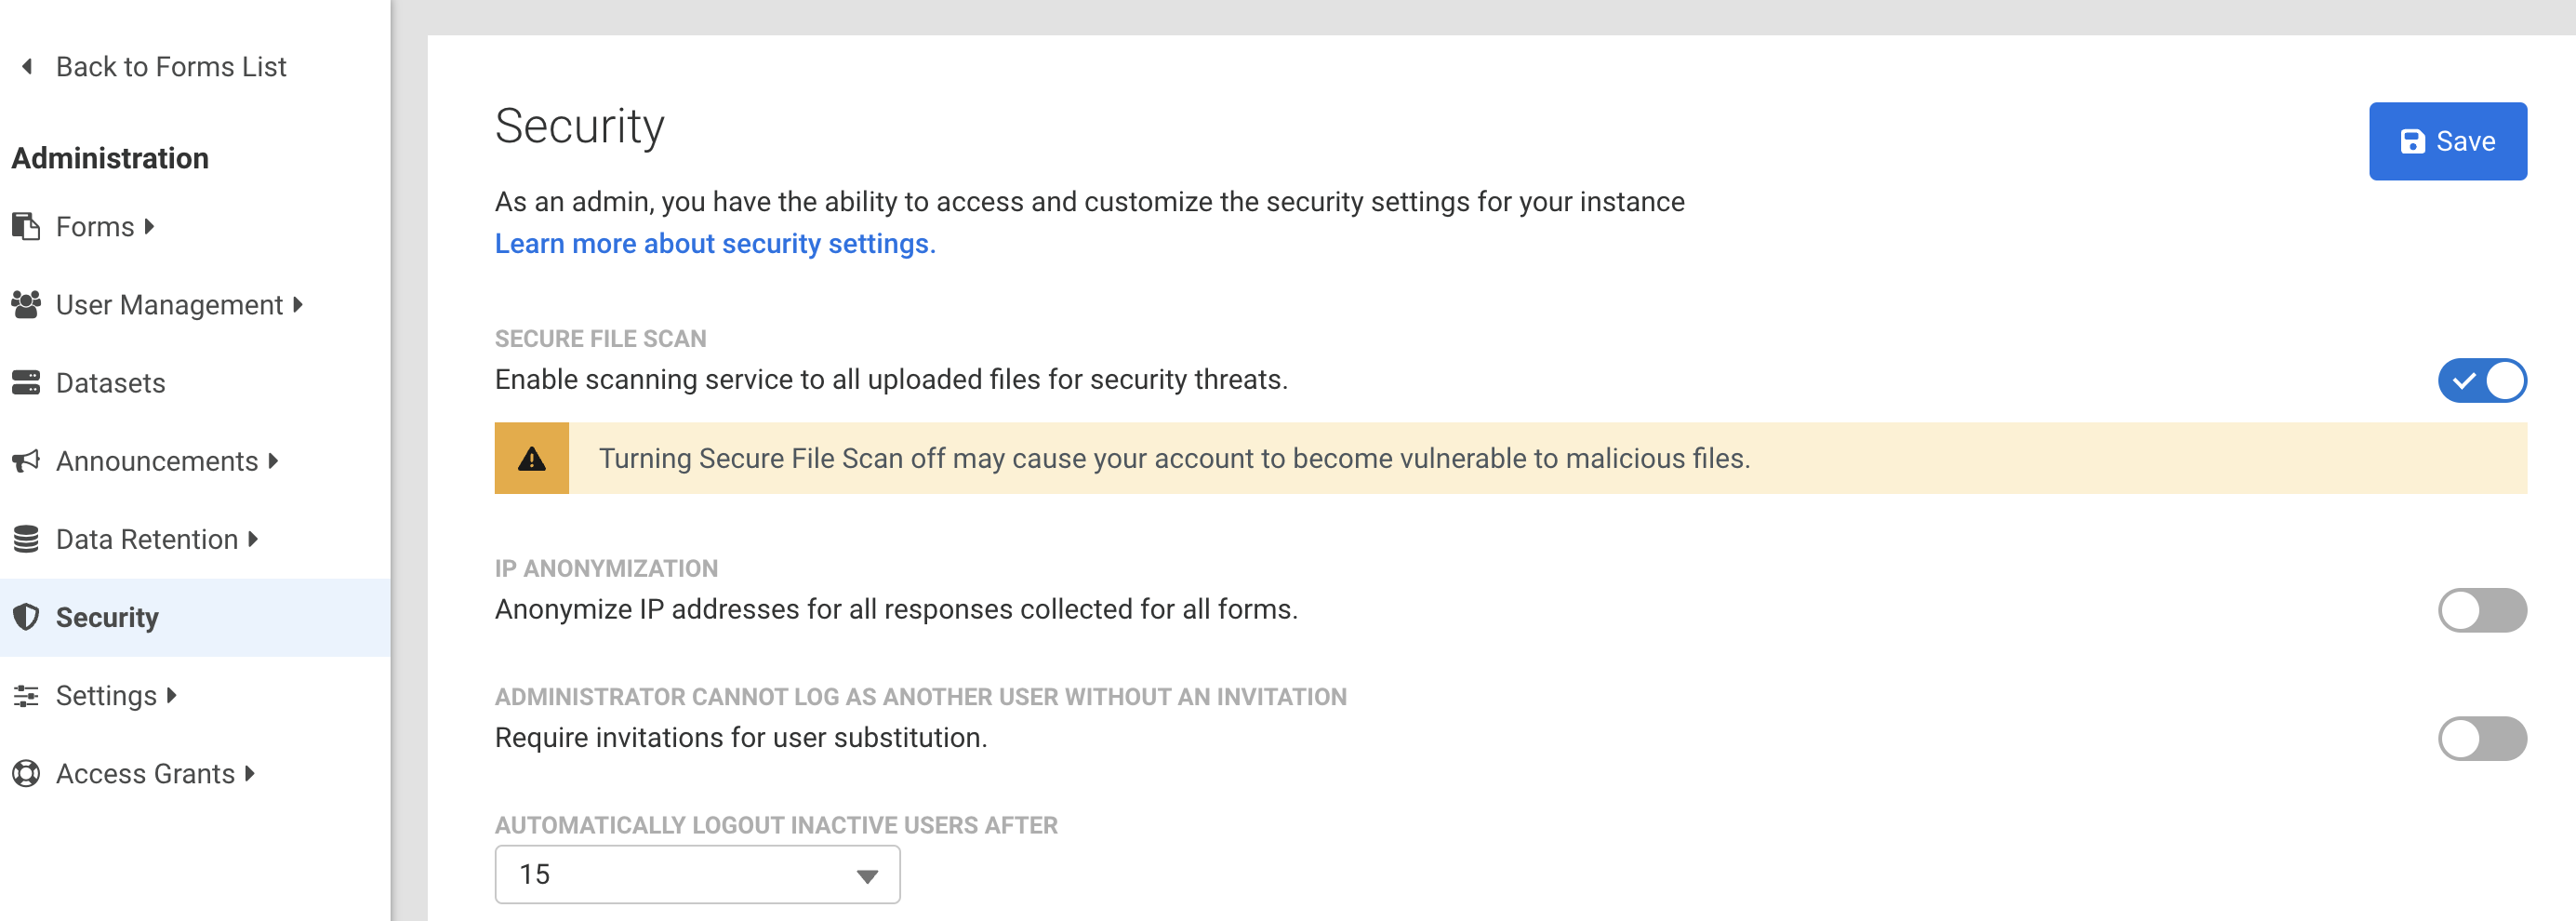
Improve your security by enabling Secure File Scan to check all incoming file upload field attachments on submitted forms and workflows. After a form is submitted, Secure File Scan checks all attachments for viruses and displays the results of each file scanned on the Response page. Any file(s) found to be unsafe will trigger an email notification to the content (form or workflow) owner for follow-up.
Requirements
- FormAssembly Enterprise or Government plan
- Administration Permission: Allow administrator to access security settings
Getting Started
Grant Admin Access to the Security Page
- Open the Admin Dashboard
- Under “User Management”, select All Users
- Locate the user profile for the administrator authorized for security management
- Edit the user profile
- Open the Permissions tab
- View the permissions under the Administration permission package
- Expand the section for Admin Permissions, if not already expanded
- Select the checkbox for “Allow administrator to access security settings”
- Click Save
Enable Secure File Scan
- From the Admin Dashboard, click Security to access the Security page.
- Toggle the switch aligned with Secure File Scan to turn on the Secure File Scan feature.
Scan Notifications
Secure File Scan results are communicated in two ways - by file upload statuses on the Response page and through email notifications to the content owner.
Response Page
On the Response page, the status of the secure file scan appears in line with each instance of a file upload. Additionally, if a file upload is flagged, a banner message will appear to highlight the identified security risk.

Secure File Scan Statuses
- Attention Required - The file is flagged due to potential risks found during the scan.
- Unable to Scan - The contents of this file were unable to be scanned.
- File Queued - The file will be scanned soon.
- If a status is not included, the file scan did not find any risks, the Secure File Scan feature is disabled, or the file upload occurred before the feature was enabled.
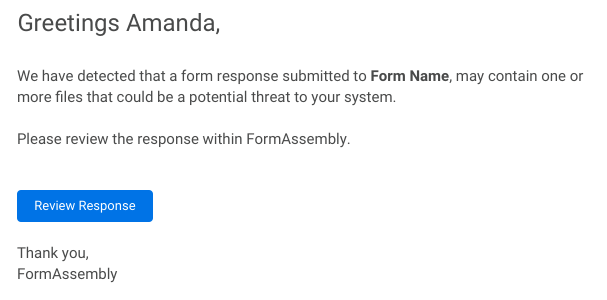
Email Notification
When a file is flagged with the Attention Required status, an email notification is sent to the content owner to notify them to review the response. This email arrives from noreply@formassembly.com with the subject line “A Response Requires Your Review”.
Additional Notes
Secure File Scanning does not halt any connectors or form processes. Content owners are notified of any malicious or unscannable files found, but files are still sent through any configured connectors as designated by your form or workflow’s configuration.
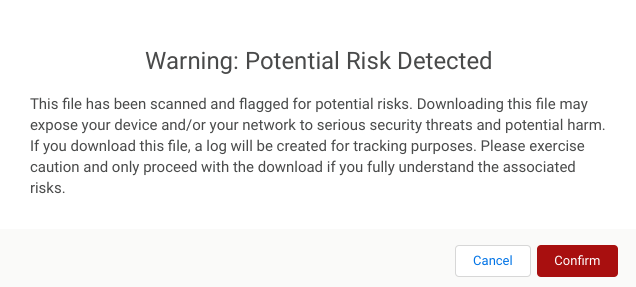
Proceeding with a Risky Download
FormAssembly provides the Secure File Scan feature, but only your own security team can recommend what to do next when a file upload is flagged. If you choose to proceed with downloading a flagged file, a confirmation message will appear. Any confirmation is logged for tracking purposes.
Overview
Control access to AI-powered features for all users on your instance by using the toggles available in the AI Features section of the Security page. These controls ensure that your team's usage of AI aligns with your company's internal data and compliance policies.
Enable or disable access to:
- AI Assistant (Fai) - helps users create, edit, and optimize forms through natural language prompts.
- File to Web Form - converts uploaded files into editable forms.
Manage AI Features
- Navigate to the Admin Dashboard.
- Click Security from the left-side menu.
- Scroll to the AI Features section.
This section contains toggle controls for AI features available to your instance.

- Enable File to Web Form Access for All Users
- On: All users can access the File to Web Form feature and upload files to generate forms
- Off: File to Web Form is disabled for all users
- Enable AI Assistance Access for All Users
- On: All users can access Fai, the AI Assistant
- Off: The AI Assistant is hidden and unavailable to all users
Overview
SAML (Security Assertion Markup Language) can be used to secure access to your FormAssembly account.
Requirements
- SAML Metadata from your IdP
- Your FormAssembly username must match your SAML username
Single Sign-On (SSO) Setup
- Navigate to the Admin Dashboard.
- Click Security from the left side menu.
- Scroll to the SAML section.
- Click Configure.
- If you're not logged in, you'll receive a notification saying, “You're not currently authenticated with your SAML Server.” Click OK on the notification and log into your SAML Domain.
- Under Update Method, choose your metadata option.
- Metadata URL Endpoint
- This is provided by the Identity Provider.
- Enter your URL Endpoint.
- Select Update Domain.
- Metadata File
- This is provided by the Identity Provider.
- Upload your Metadata File.
- Select Update Domain.
- Manual (Advanced)
- Add SAML data manually.
- After entering your data, click Apply.
- Select Update Domain.
- Metadata URL Endpoint
- After changes have been saved, your domain is set up and more options are shown for updating.
- Click Retrieve Attributes.
- If you're not logged in, you'll receive a notification saying, “You're not currently authenticated with your SAML Server.” Click OK on the notification and log into your SAML Domain.
- Your IdP attributes will be shown in the User Authentication table.
- These attributes will be disabled by default so you can enable the attributes that you'd like to use.
- Enable a Unique SAML Attribute from the table.
- If you do not select a unique SAML attribute, you'll receive a red error indicating your changes were not saved.
- Your unique SAML attribute must be enabled for SAML to be used.
- Enter an Authentication Formula, if needed.
- Click Apply to save your changes.
SAML Login Enforcement
Administrators can enforce a standardized login method for all users of the FormAssembly Instance or allow logins to be managed by user-level login preferences.
Login by Instance
- Locate the Instance Login Method section, on the Security page in the Admin Dashboard.
- Select SAML from the dropdown.
- Select whether to allow administrators to override the SAML login method.
- Allowing an administrator to override the login method would enable an admin to quickly recover the instance in the case of the SAML provider outage.
- Click Save at the top of the page to save your settings.
Login by User
- Access your All Users list.
- Locate and edit the User(s) that need to use SAML
- Select SAML, under the User Login Method of the Account section.
- Click Save User at the top of the page to save the change.
Advanced Configuration of Metadata Fields
The following metadata fields may require additional consideration or special formatting:
NameIdFormat
The default value for this field is urn:oasis:names:tc:SAML:1.1:nameid-format:unspecified. If this field is left blank, the default value will be used.
The following formats are supported:
- urn:oasis:names:tc:SAML:1.1:nameid-format:emailAddress
- urn:oasis:names:tc:SAML:1.1:nameid-format:X509SubjectName
- urn:oasis:names:tc:SAML:1.1:nameid-format:WindowsDomainQualifiedName
- urn:oasis:names:tc:SAML:1.1:nameid-format:unspecified
- urn:oasis:names:tc:SAML:2.0:nameid-format:kerberos
- urn:oasis:names:tc:SAML:2.0:nameid-format:entity
- urn:oasis:names:tc:SAML:2.0:nameid-format:transient
- urn:oasis:names:tc:SAML:2.0:nameid-format:persistent
- urn:oasis:names:tc:SAML:2.0:nameid-format:encrypted
RequestedAuthNContext
The default value for this field is urn:oasis:names:tc:SAML:2.0:ac:classes:PasswordProtectedTransport. If this field is left blank, the default value will be used.
The following formats are supported (Multiple values may be entered separated by a comma ","):
- urn:oasis:names:tc:SAML:2.0:ac:classes:unspecified
- urn:oasis:names:tc:SAML:2.0:ac:classes:Password
- urn:oasis:names:tc:SAML:2.0:ac:classes:PasswordProtectedTransport
- urn:oasis:names:tc:SAML:2.0:ac:classes:X509
- urn:oasis:names:tc:SAML:2.0:ac:classes:Smartcard
- urn:oasis:names:tc:SAML:2.0:ac:classes:Kerberos
- urn:federation:authentication:windows
- urn:oasis:names:tc:SAML:2.0:ac:classes:TLSClient
Updating Your SAML SSL Certificate
If you need to update your SAML SSL certificate you will use the self-serve configuration steps above to do so.
- If you already have a SAML configuration set up in your FormAssembly account you would update that configuration with your new metadata file with the new certificate, which you will import as part of the configuration.
- If you do not have a SAML configuration set up in your FormAssembly account, and your SAML configuration was originally set up by FormAssembly you will need to follow the process in this document to set up a SAML configuration in your FormAssembly account to update your SAML SSL certificate.
Administrators can enforce a standardized login method (such as SSO) for all users of the FormAssembly Instance or allow logins to be managed by user-level login preferences.
To adjust the login method for all users:
- Locate the Instance Login Method section, on the Security page in the Admin Dashboard.
- Select a login method from the following dropdown options:
- Manage via user’s settings: The login method set at the user account level will be used.
- FormAssembly: The standard FormAssembly account login method uses your FormAssembly username and password.
- LDAP: Uses your LDAP (or Active) Directory as the login method.
- To configure LDAP for your instance, please open a case with FormAssembly Support and refer to our LDAP authentication article.
- SAML: Uses your configured SAML identity provider as the login method.
- To configure SAML for your instance, refer to our SAML authentication article.
- Select whether to allow administrators to override the login method.
- Allowing an administrator to override the login method would enable an admin to quickly recover the instance in the case of an identity provider outage.
- Click Save at the top of the page to save your settings.

To adjust the login method for a specific user:
- Navigate to User Management | All Users and select Edit User.
- Select a login method from the User Login Method dropdown on the General tab. Choose from the following options:
- FormAssembly: The standard FormAssembly account login method uses your FormAssembly username and password.
- SAML: Uses your configured SAML identity provider as the login method.
- To configure SAML for your instance, refer to our SAML authentication article.
- LDAP: Uses your LDAP (or Active) Directory as the login method.
- To configure LDAP for your instance, please open a case with FormAssembly Support and refer to our LDAP authentication article.
- Click Save User at the top of the page to finalize.

Overview
IP Anonymization is an optional privacy setting that automatically anonymizes IP addresses collected with form submissions.
Requirements
- An administrator must enable IP Anonymization before use is available
Definition
When this feature is enabled, the last octet of IPv4 addresses and the last 80 bits of IPv6 addresses are replaced with zeros. This guarantees that the IP address cannot be used to uniquely identify the computer used to submit a response to a form.
Note that the collection of other Personally Identifiable Information (PII) is under the responsibility of the form creator. Such information, if requested through the form, is not anonymized.
How to Enable IP Anonymization
Follow these steps to enable this feature.
- Go to Admin Dashboard | Settings and navigate to the Miscellaneous page. From here you can view the Privacy Settings section.
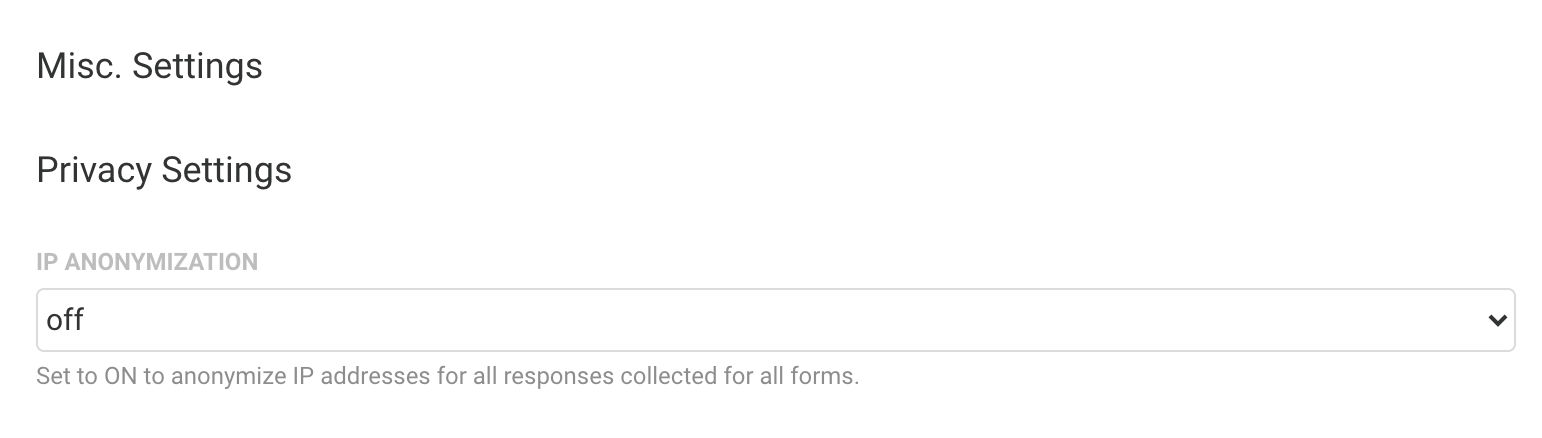
- Set IP Anonymization to ON.
- Click the Apply button at the bottom of the page.

Overview
The Access Grants in FormAssembly can be used to accomplish two functions. First, if your organization needs support from the FormAssembly team, you can grant access to your forms so that we can better troubleshoot any issues you might be facing.
Second, as an Administrator, you can decide the level of access you will have to your users' forms. You can either choose to be able to use the Admin Override function to log in as any of your users, or you can choose to use Access Grants, where your users would need to permit you to access their forms.
Details on how to enable and disable this feature can be found in the following sections.
Requirements
- Administration Permission: Allow administrator to access security settings
- (optional) Administration Permission: Allow administrator to access user's data
Enabling or Disabling the Access Grants for Administrators
From the Admin Dashboard, go to Security. Use the toggle under the header "Administrator cannot log as another user without an invitation" to enable or disable the feature. If the feature is disabled, you will be able to log in as any of your users without needing them to grant you access.

To access your users' forms without permission, you must enable the Administration Permission "Allow administrator to access user's data" for your account.

Please ensure that you have clicked Save after making changes to either of these settings.
Getting Started
To begin, use the dropdown Help menu at the top right of FormAssembly to select Grant Access.

You will be taken to the Grant Access page, where you will see two options: Administrator Support and FormAssembly Support.
If your users need to grant you access, as an administrator, they would select Go to Administrator Support.
If you or your users need to grant access to FormAssembly to troubleshoot an issue, select Go to FormAssembly Support.

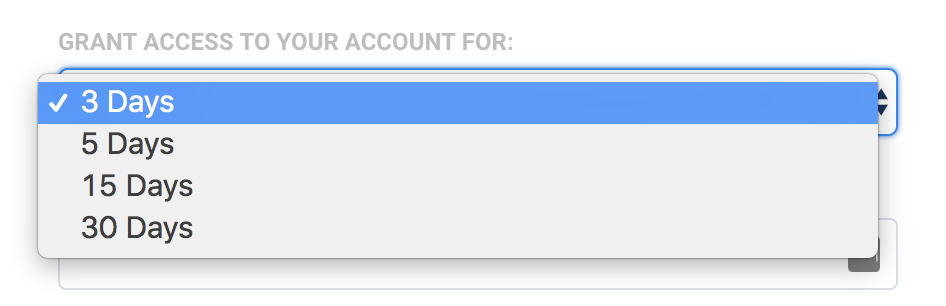
Granting Administrator Access
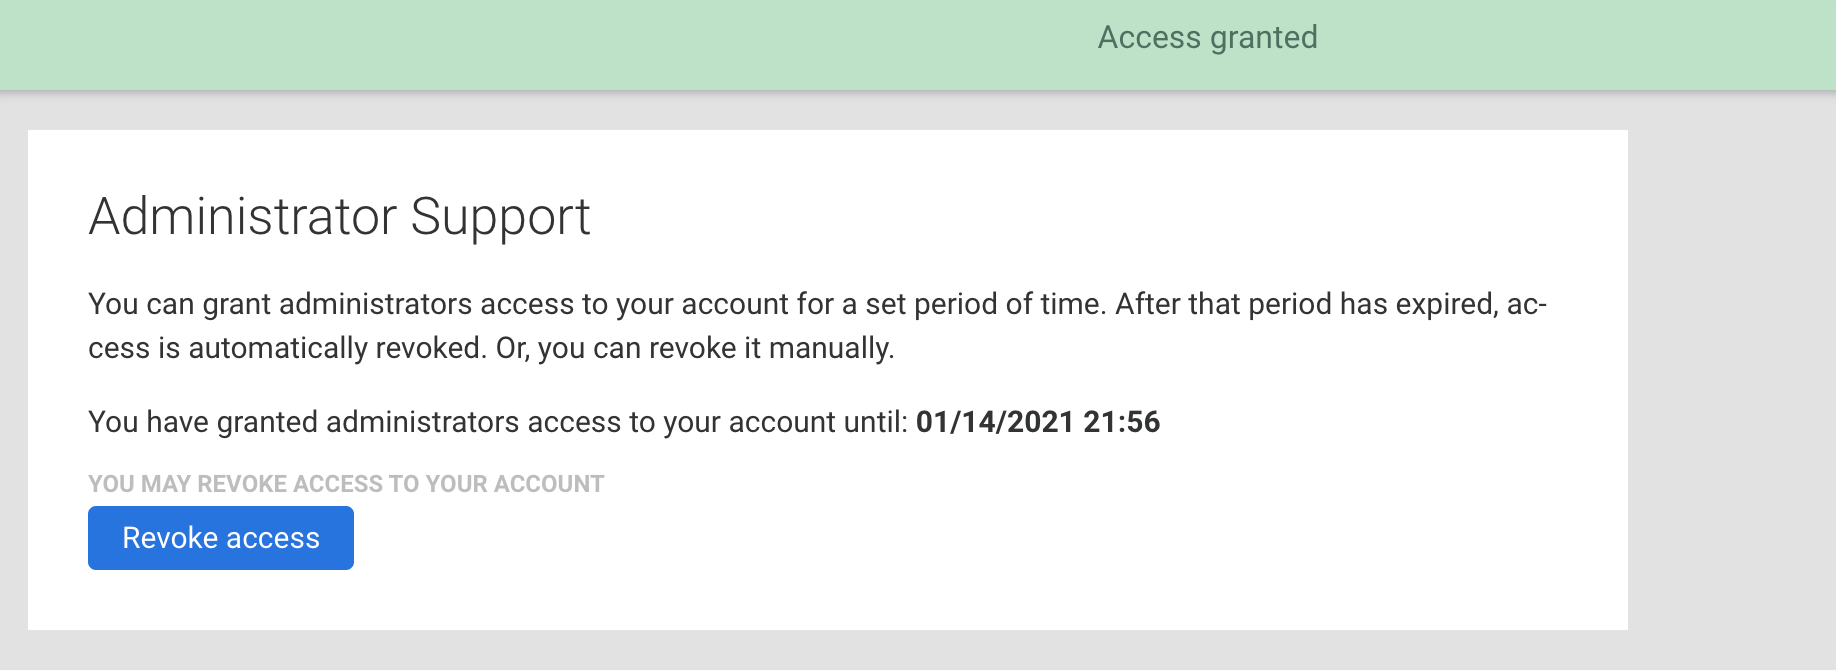
Once you click Go to Administrator Support, you will be taken to the Administrator Support screen, where your users can select the number of days account access will be granted (3, 5, 15, or 30 days). When a selection is made, they will need to confirm their password and click Grant Access.
Provided the user's password is correct, the Administrator Support screen will update and display the date and time the administrator's access will expire. The user can revoke this access at any time by clicking the Revoke Access button.
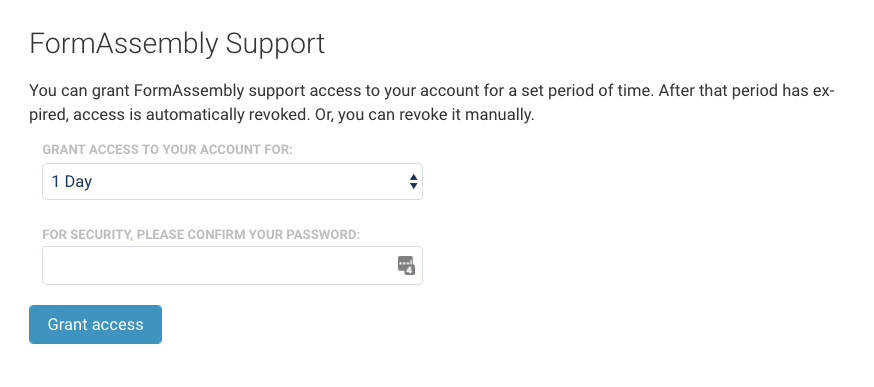
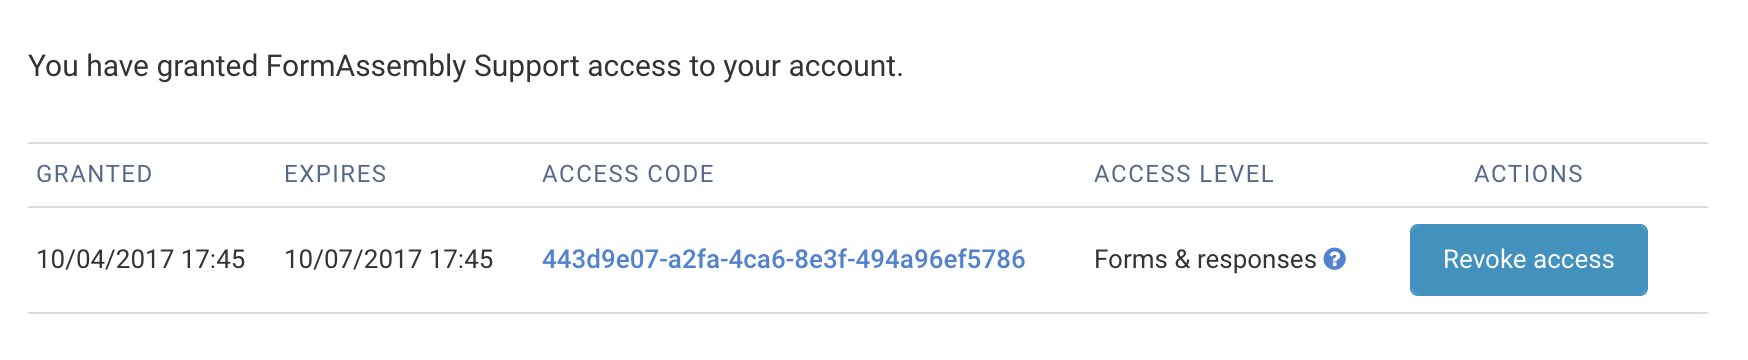
Granting FormAssembly Access
If the need arises for you to grant the FormAssembly support team access to your account, you can do so by clicking the Go to FormAssembly Support button.
Next, select the number of days (3, 5, 15, or 30) to allow access.
You will also need to select the access type.
- Selecting Forms and Responses will grant access to your forms, connectors, notifications, processing options, and form responses.
- Selecting Full Access will grant access to all of these options plus the Admin Dashboard (if you are an administrator), General Settings, and Account Pages.

Once selected, you will need to enter your FormAssembly password and click Grant Access.
Once access has been granted to FormAssembly, you can see your current access grants at the bottom of the page. You can revoke this access at any time by clicking the Revoke Access button
Reviewing Access Grants
If you are an administrator and you need to review the active Access Grants for your instance, they are accessible on the Admin Dashboard sidebar. You have a dropdown menu labeled Access Grants from which you can view both Admin Support grants and FormAssembly Support grants.

What is SSL?
SSL (Secure Sockets Layer) is a security protocol which creates a secure connection to transmit data.
This option enables the SSL protocol for your form, resulting in the encryption of the submitted data while it transits over the network.
Is my form secure?
All new FormAssembly forms are SSL by default since August 2015.
TLS
Transport Layer Security, also known as TLS, is a cryptographic protocol that provides end-to-end communications security over networks and is widely used for internet communications and online transactions. It is an IETF standard intended to prevent eavesdropping, tampering and message forgery.
FormAssembly keeps up with the latest protocols to ensure security. We are currently compliant with the latest and strongest version of TLS, 1.2.
Inactive FormAssembly users are automatically logged out after a set amount of inactive minutes.
Choose from a dropdown of 5, 10, or 15 minutes to adjust the inactive user logout setting.

You can customize the expiration time (in days) for all resume links sent from workflows and Review Before Submit links of your FormAssembly instance. The default is 7 days, but you can set any value between 1 and 365 days. This setting applies to all resume links and cannot be limited to specific workflows.

Introduction
When working with FormAssembly connectors, there may be times when you need to whitelist FormAssembly IP addresses to be able to receive the information being passed from FormAssembly. In those cases, please whitelist the IP addresses listed below.
IP Addresses for Whitelisting
All FormAssembly plans have Trusted IPs to whitelist per the chart below. These IPs are for customers whose instances are hosted inside the US.
FormAssembly Offering | Trusted IPs |
|---|---|
Professional, Premier, and Basic plans | 34.230.105.243 18.221.37.214 |
Essentials, Team, and Enterprise plans | 35.169.15.41 34.231.230.11 18.217.101.3 18.217.15.195 |
Government plan | Contact Support |
Please refer to the list below for customer instances hosted outside the US.
Frankfurt
18.196.248.135
Paris
15.188.178.68
London
52.56.159.99
Singapore
13.229.172.189
Sydney
13.210.101.251
Montreal
52.60.131.5
IP Whitelisting in Salesforce Marketing Cloud
If you are running into errors when trying to validate your Client ID and Client Secret with the Salesforce Marketing Cloud Connector, you may need to ensure that FormAssembly's IP addresses have been whitelisted within your Marketing Cloud Setup.
An example of such an error would be:
Unable to validate App Keys(ClientID/ClientSecret) provided.: Unable to validate App Keys(ClientID/ClientSecret) provided, requestToken response:{"message":"Unauthorized","errorcode":1,"documentation":""}
Please ask your Salesforce Marketing Cloud administrator to follow the steps below to resolve this.
1. Check your IP Whitelist Settings
Once your Salesforce Marketing Cloud administrator has logged into their account, they will need to navigate to Admin → Account Settings → Security Settings.
Once there, they should look under Username and Logins to see if "Restrict Logins by IP Address (IP Whitelisting) is disabled.
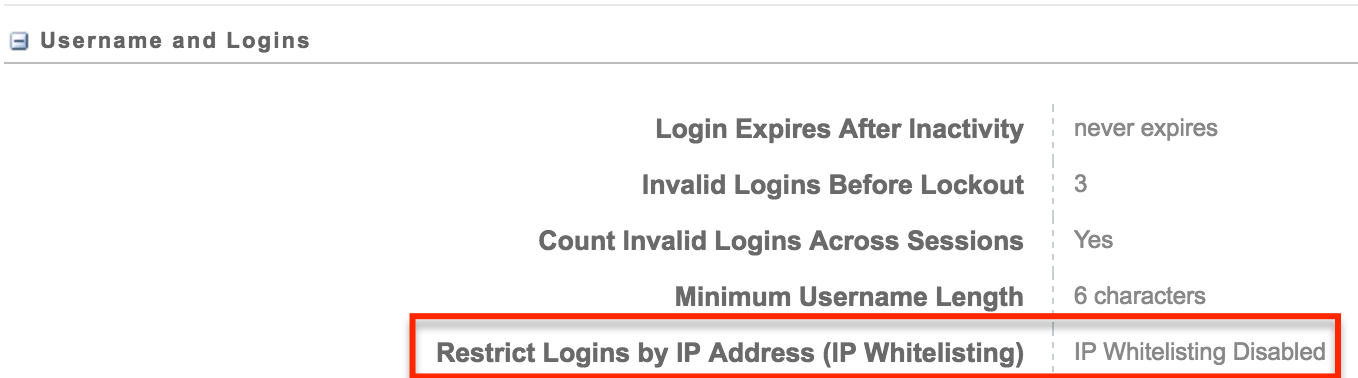
If this feature is enabled, then you will need to add FormAssembly's IP address ranges to that list.
2. Update your IP Login Whitelist
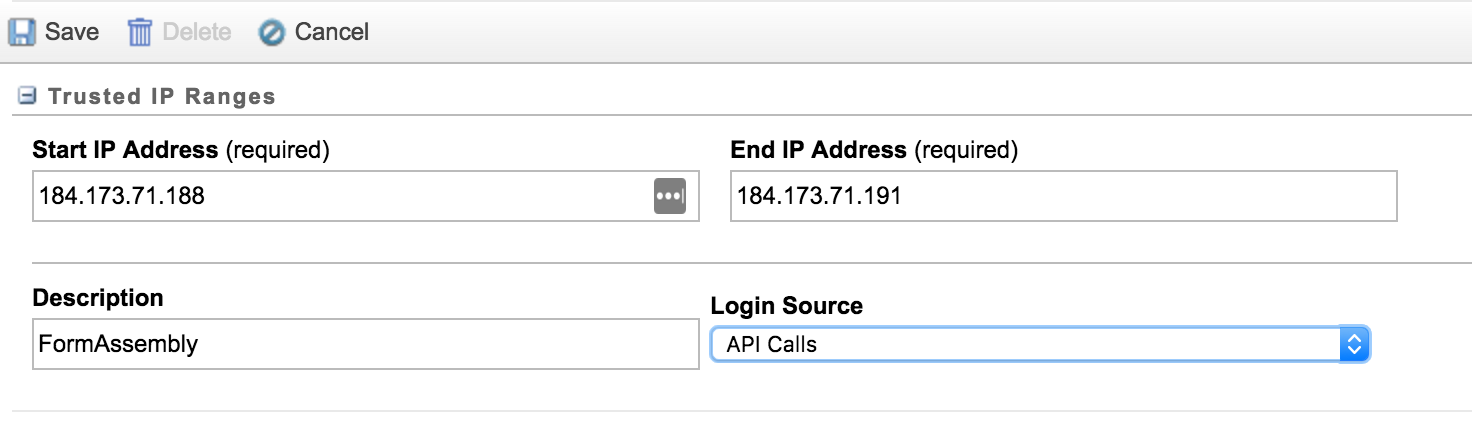
To add FormAssembly's IP ranges to your whitelist, you will need to navigate to Security → Login IP Whitelist.
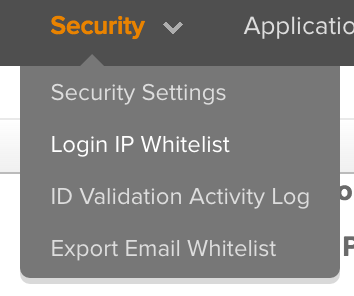
Click on Create at the top left and enter the start IP address and end IP address from the list below. You will need to enter each IP.
Once you have added the Start and End IP addresses, you can add a Description to identify that this range is used for FormAssembly. You must also select API Calls from the Login Source dropdown list.
Make sure to click Save after each range you add in.